In today’s tutorial we will demonstrate how to combine Illustrator and Photoshop to create a 3D, textured spray can. This tutorial requires some basic understanding of Illustrator and Photoshop as well as the pen tool. Let’s get started!
Step 1
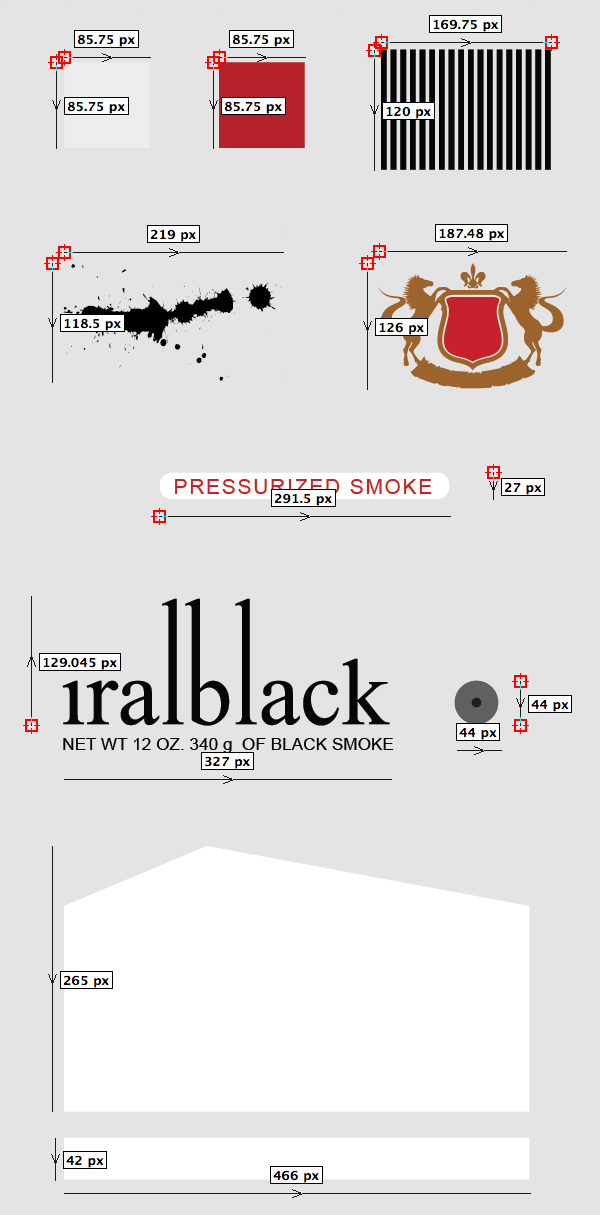
Open Adobe Illustrator. Create a new document. The first step is to create all the materials and elements that will appear on the can. Most of them are basic shapes and text. I created the spatter and the shield for this tutorial. You can use them or you can find free similar vector elements over the Internet.
Note that I included measurements for you to have an idea of the size and proportion, but you don’t have to be exact. You can always resize things later if you need to.
Step 2
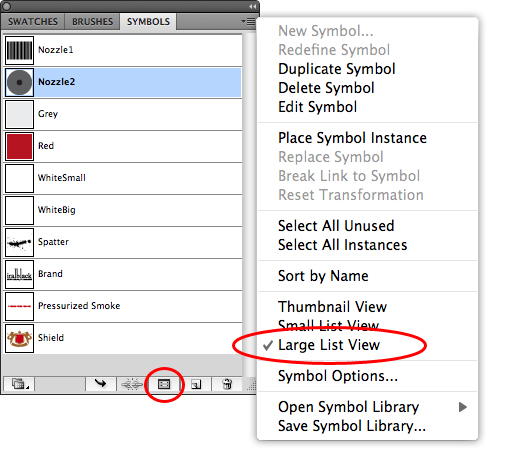
In the menu, go to Windows / Symbols to open the Symbols Window. Drag each of the elements you just created to the Symbols Window to convert them to symbols.
In the Symbols Window open the menu from the top right corner and select "Large List View.
Select the Symbol Options button at the bottom of the window and rename each of the Symbols as seen in the following image. Finally you can delete them from the stage.
Step 3
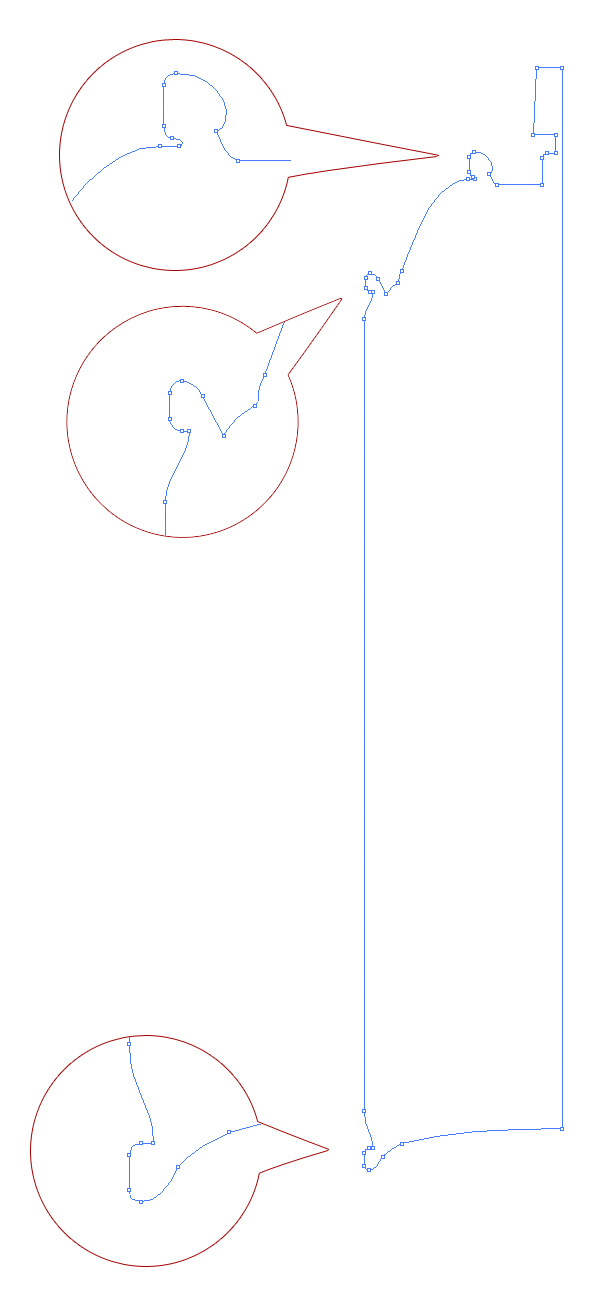
With the Pen Tool (P) create a shape like in the image below. Try to respect the amount of anchor points.
Step 4
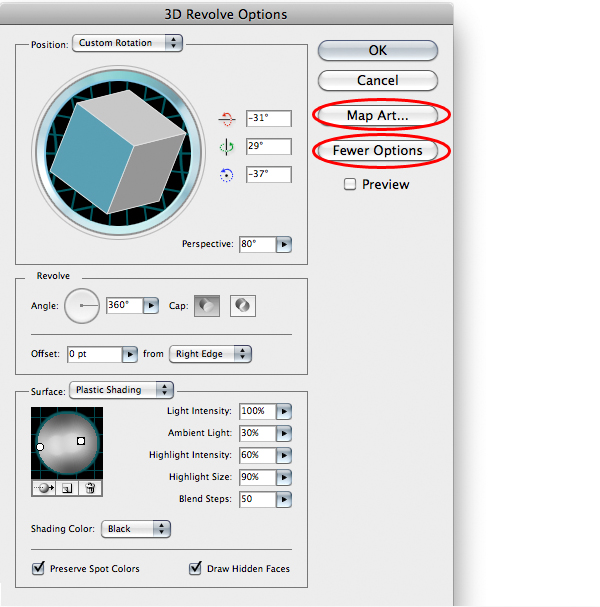
Go to the menu and click Effect > 3d > Revolve. Enter the values of the following image.
Step 5
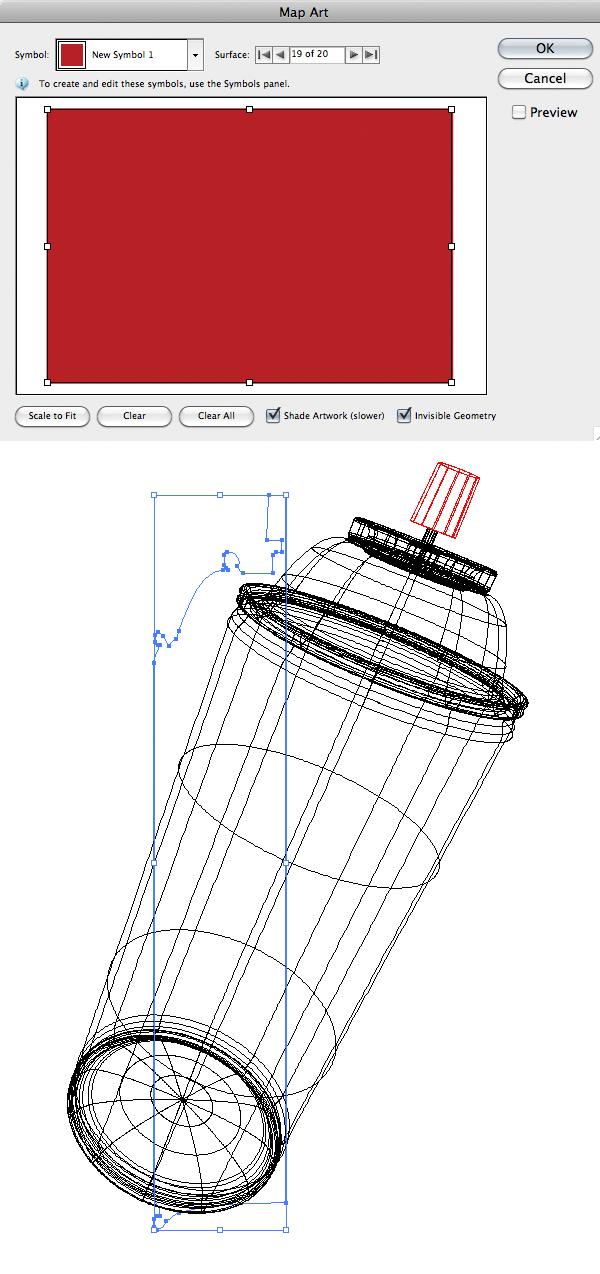
On the 3D Revolve Options Window click the Map Art button. Check Shade Artwork and check Invisible Geometry. For now we will only use the Red and Grey boxes that we converted to symbols. Use the arrow buttons to navigate through each surface. Following the Image in Step 6, apply the corresponding material, selecting it from the Symbol list menu.
Note that the wireframe turns red on the surface that is selected. If the material/symbol is too small for the surface, click the Scale to Fit button. Finally click OK on the Map Art Window and on the 3D Revolve Options Window.
Step 6
You should have something like this.
Step 7
Now open the Layers Window if it is not already open. Rename the <Path> to MAIN.
Step 8
Select your main shape; duplicate it by dragging it to the Create New Layer button at the bottom of the Layers Window. Rename the new MAIN path to WHITE BIG.
Step 9
Hide the MAIN path. Select the WHITE BIG path. Open the Appearance Window and select the 3D Revolve (Mapped) Link. Click on the Map Art button.
Step 10
First remove all the Symbols from all the surfaces. If you created exactly the same amount of anchor points you have to select Surface 5. If not, don’t worry, just find the surface that matches the one in the following image and position the White Big symbol as seen in the following image.
Step 11
Now we will repeat steps from 7 to 10 several times to position all the different elements. You may be asking: What is the advantage of placing the elements in several overlapping paths over making only one symbol with everything inside?
- You can copy each individual element to Photoshop as individual layers.
- This allows for a more efficient use of computer resources because you can hide all unused elements if you need to.
Duplicate the WHITE BIG path by dragging it to the Create New Layer button at the bottom of the Layers Window. Rename the new WHITE BIG path to WHITE SMALL.
Select the WHITE SMALL path. Open the Appearance Window and select the 3D Revolve (Mapped) Link. Click on the Map Art button. Remove all the symbols from all the surfaces. Find the surface that matches the one of the following image and position the White Small symbol as seen in the following image. Finally click OK on the Map Art Window and on the 3D Revolve Options Window.
Step 12
Duplicate the WHITE SMALL path by dragging it to the Create New Layer button at the bottom of the Layers Window. Rename the new WHITE SMALL path to SHIELD.
Select the SHIELD path. Open the Appearance Window and select the 3D Revolve (Mapped) Link. Click on the Map Art button. Remove all the symbols from all the surfaces.
Find the surface that matches the one of the following image and position the Shield symbol as seen in the following image. Finally click OK on the Map Art Window and on the 3D Revolve Options Window.
Step 13
Duplicate the SHIELD path by dragging it to the Create New Layer button at the bottom of the Layers Window. Rename the new SHIELD path to PRESSURIZED.
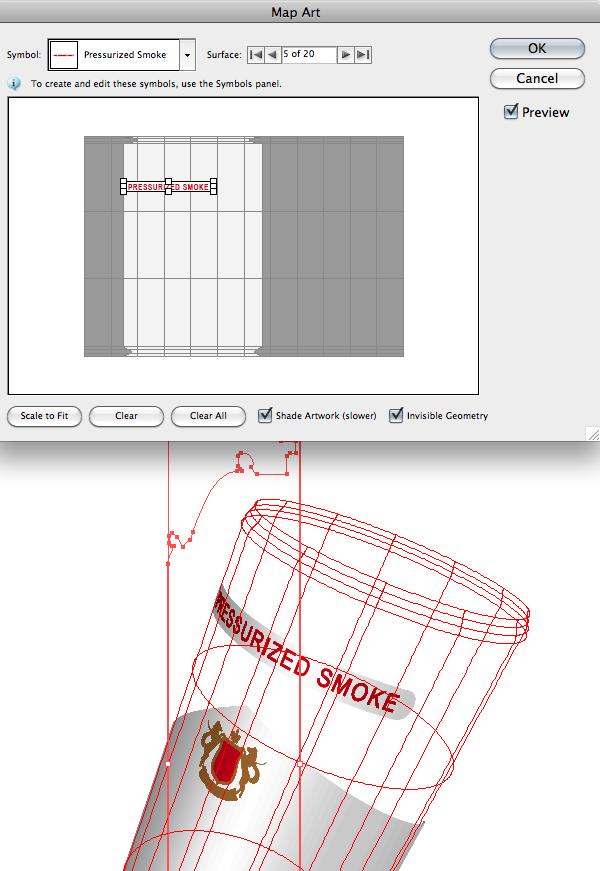
Select the PRESSURIZED path. Open the Appearance Window and select the 3D Revolve (Mapped) Link. Click on the Map Art button. Remove all the symbols from all the surfaces.
Find the surface that matches the one in the following image and position the Pressurized Smoke symbol as seen in the following image. Finally click OK on the Map Art window and on the 3D Revolve Options Window.
Step 14
Duplicate the PRESSURIZED path by dragging it to the Create New Layer button at the bottom of the Layers Window. Rename the new PRESSURIZED path to BRAND.
Select the BRAND path. Open the Appearance Window and select the 3D Revolve (Mapped) Link. Click on the Map Art button. Remove all the symbols from all the surfaces.
Find the surface that matches the one of the following image and position the Brand symbol as seen in the following image. Finally click OK on the Map Art Window and on the 3D Revolve Options Window.
Step 15
Duplicate the BRAND path by dragging it to the Create New Layer button at the bottom of the Layers Window. Rename the new BRAND path to NOZZLE1.
Select the NOZZLE1 path. Open the Appearance Window and select the 3D Revolve (Mapped) Link. Click on the Map Art button. Remove all the symbols from all the surfaces.
Find the surface that matches the one of the following image and position the Nozzle1 symbol as seen in the following image. Finally click OK on the Map Art window and on the 3D Revolve Options Window.
Step 16
Duplicate the NOZZLE1 path by dragging it to the Create New Layer button at the bottom of the Layers Window. Rename the new NOZZLE1 path to NOZZLE2.
Select the NOZZLE2 path. Open the Appearance Window and select the 3D Revolve (Mapped) Link. Click on the Map Art button. Remove all the symbols from all the surfaces.
Find the surface that matches the one in the following image and position the Nozzle2 symbol as seen there. Finally click OK on the Map Art Window and on the 3D Revolve Options Window.
Step 17
Duplicate the NOZZLE2 path by dragging it to the Create New Layer button at the bottom of the Layers Window. Rename the new NOZZLE2 path to SPATTER.
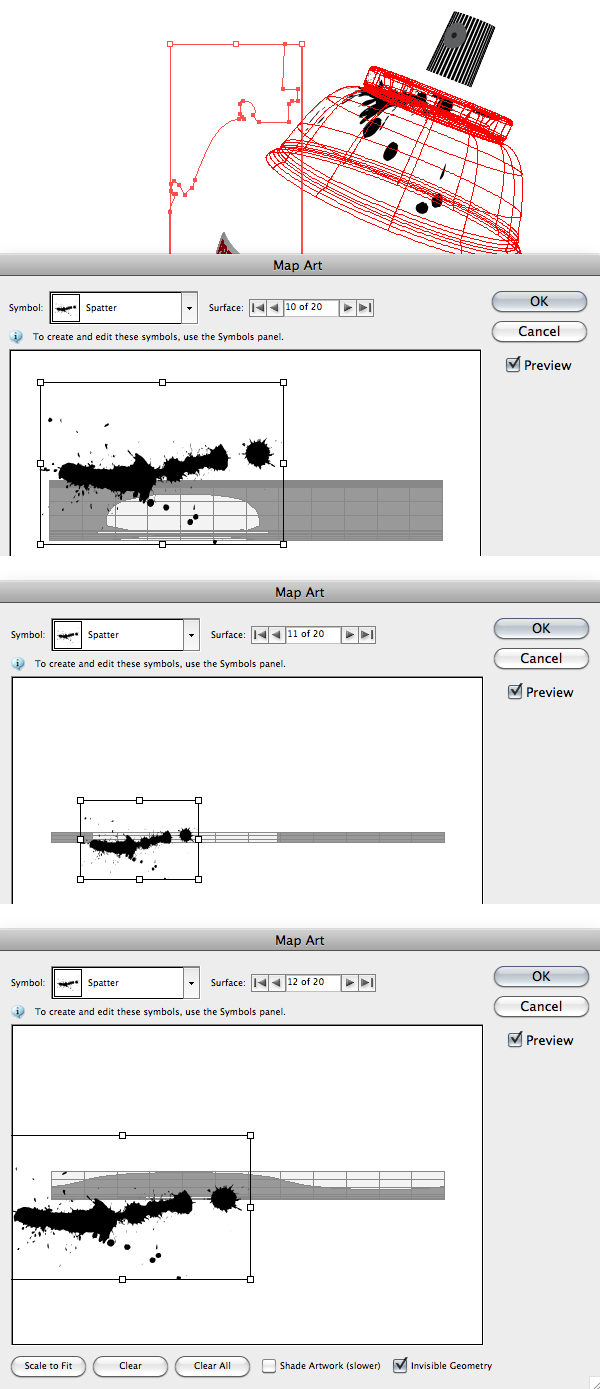
Select the SPATTER path. Open the Appearance Window and select the 3D Revolve (Mapped) Link. Click on the Map Art button. Remove all the symbols from all the surfaces.
This time I am going to apply the Spatter symbol to 3 of the surfaces; in this example, it will be surfaces 10, 11 and 12. Take the following image as a guide to identify the surfaces in your case. Finally click OK on the Map Art window and on the 3D Revolve Options Window.
Step 18
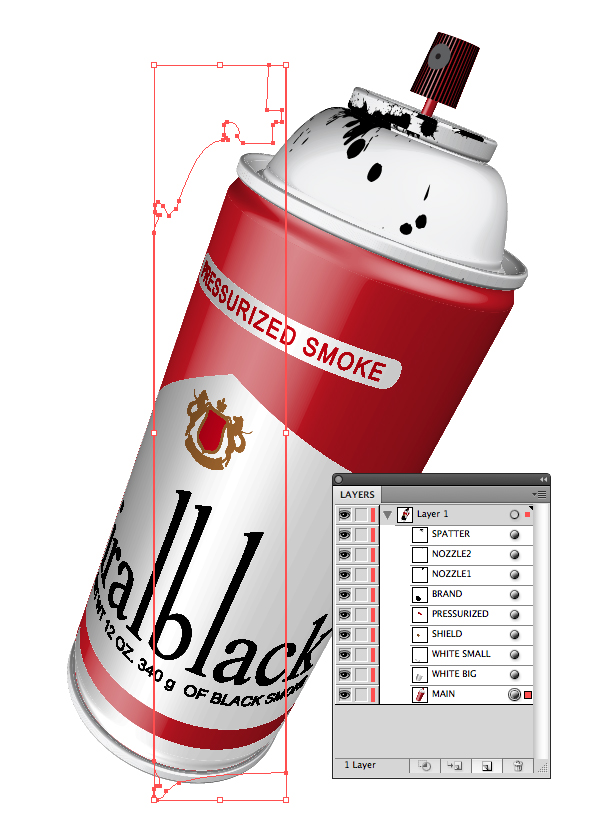
Reveal all paths, and by now you should have something similar to what is seen in the image bellow.
Step 19
Now open Adobe photoshop and let’s make a new 600 px x 1000 px file. If your "background" layer is white press Command/Ctrl + I to invert it. The background must be black. Duplicate the background layer by dragging it to the Create a New Layer button. Rename your new layer to "MyBg". Double click your "MyBg" layer and apply the Inner Glow and Gradient Overlay Styles with the settings of the following image. Press OK
Step 20
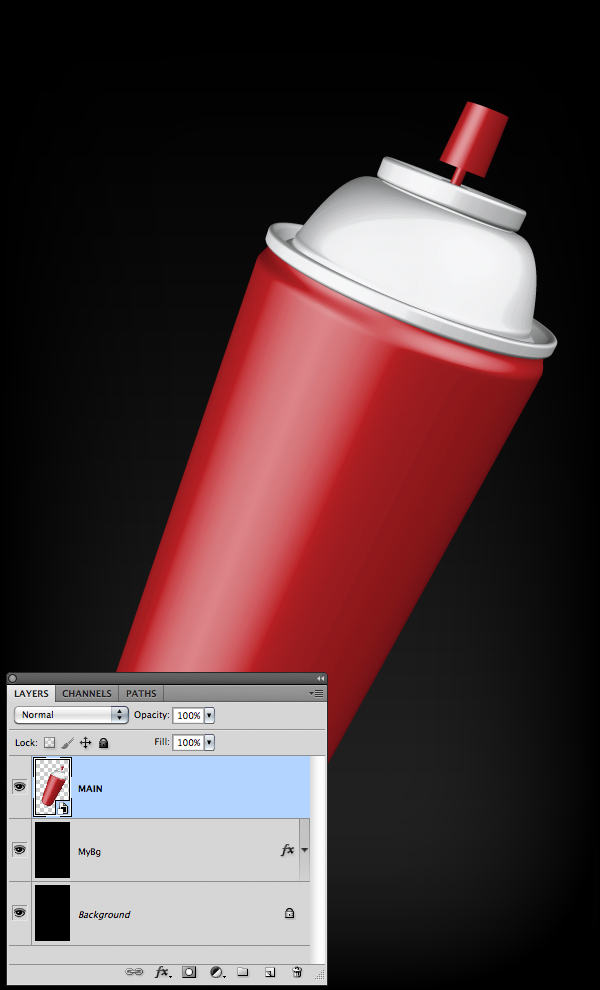
Go to your Illustrator file and copy (Command/Ctrl + C) your MAIN shape and paste it (Command/Ctrl + V) on your Photoshop file as a Smart Object.
Step 21
Go to your Illustrator select WHITE BIG and WHITE SMALL shapes and copy them (Command/Ctrl + C). Paste them (Command/Ctrl + V) on your Photoshop file as a Smart Object. And rename the layer to WHITE.
Do the same for the rest of the shapes one by one. Rename all the layers as seen in the following image.
Step 22
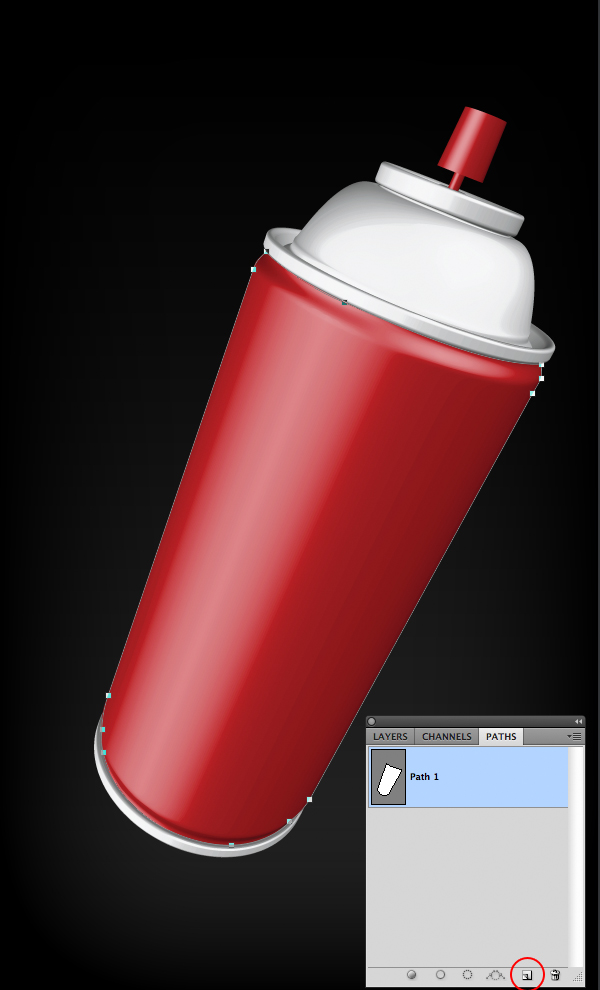
Hide all layers but MAIN. Go to the PATHS window (Window /Paths) and press the Create New Path button at the bottom of the window. Select the Pen Tool (P) and make a path surrounding the red part on the body of the spray. Press Command/Ctrl and click over the thumbnail of the path to make a selection out of the path.
Step 23
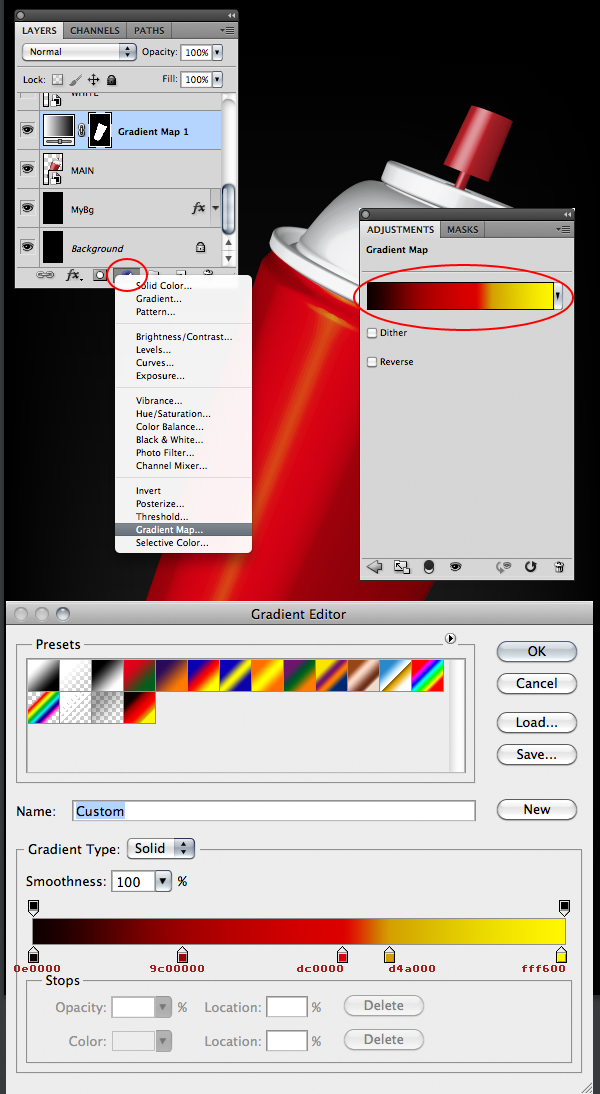
Go to the Layers Window and press the Create New Fill or Adjustment Layer button at the bottom of the Layers Window. Select Gradient Map. Double click on the icon of the gradient map to bring out the Adjustments Window. Click over the Gradient Map of the Adjustments Window and edit the gradient as seen in the following image. Press OK
Step 24
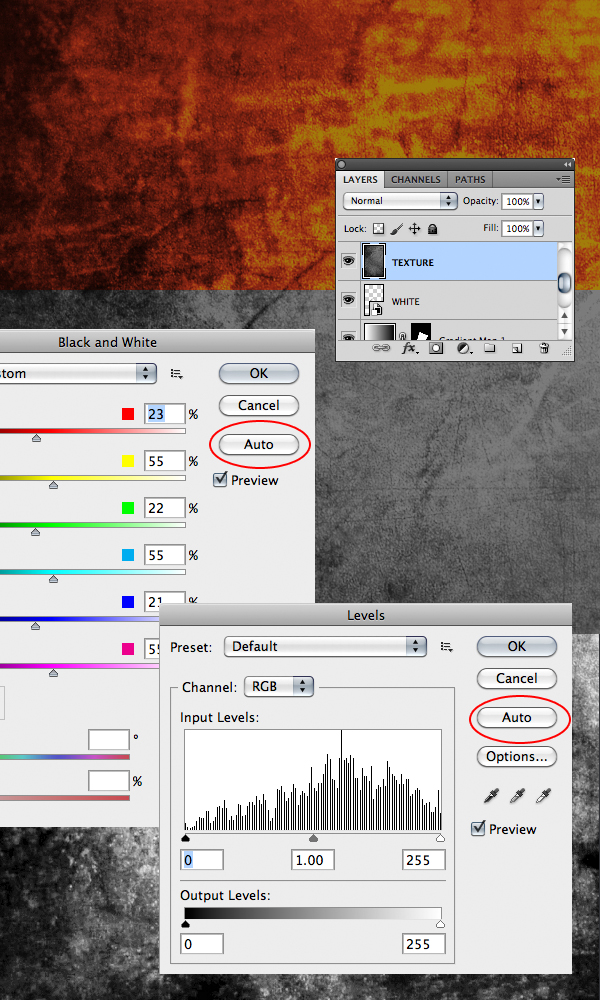
Now you need a grunge texture, you can use the one I provided with this tutorial. Open it and paste it on your file, over the WHITE layer. Rename the layer of the texture to TEXTURE. In the menu, go to Image > Adjustments > Black and White. Press the Auto button and press OK. In the menu, go to Image > Adjustments > Levels. Press the Auto button and press OK.
Step 25
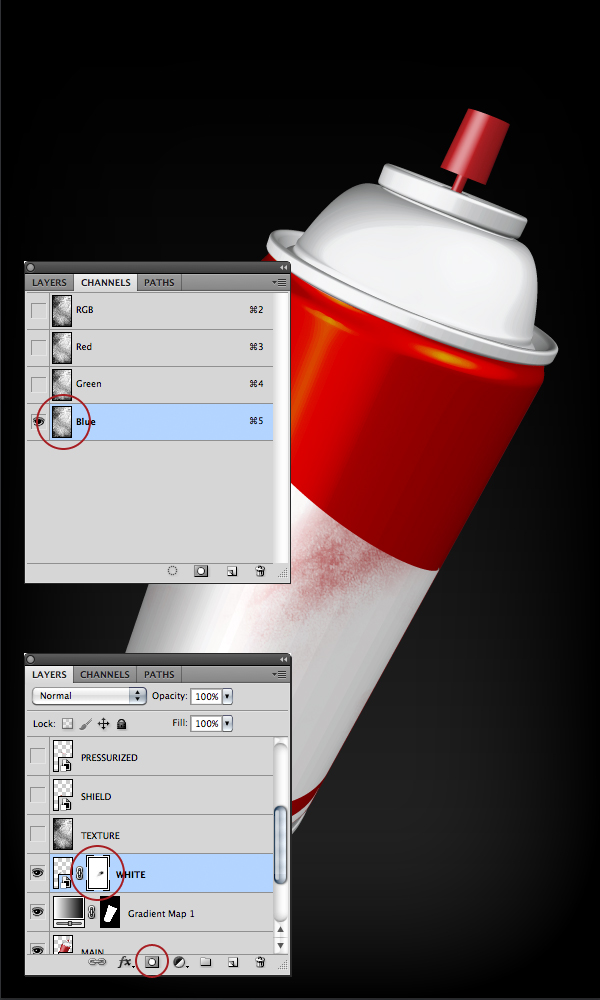
With the WHITE layer selected, click the Add Layer Mask button at the bottom of the Layers Window. Go to the Channels window and press Command/Ctrl + Click over the thumbnail of any of the channels Red, Green or Blue to make a selection out of it. Go back to the Layers Window and hide the TEXTURE layer. Select the Layer Mask thumbnail of the WHITE layer. Press Command/Ctrl + H to hide the selection. Paint the parts of the WHITE layer where you want the scratches to appear color black. You can paint with color white to hide the scratches.
Step 26
Press Command/Ctrl + H again to reveal the selection. Now let’s save the selection because we will use it later. In the menu go to Select / Save Selection and enter "SELECTION" on the Name field. That will create a new channel named SELECTION. Press Command/Ctrl + D to remove the selection.
Now that we have saved our selection we can go and delete the TEXTURE layer selecting it and pressing the Delete key or dragging it to the little trash can at the bottom of the Layers Window.
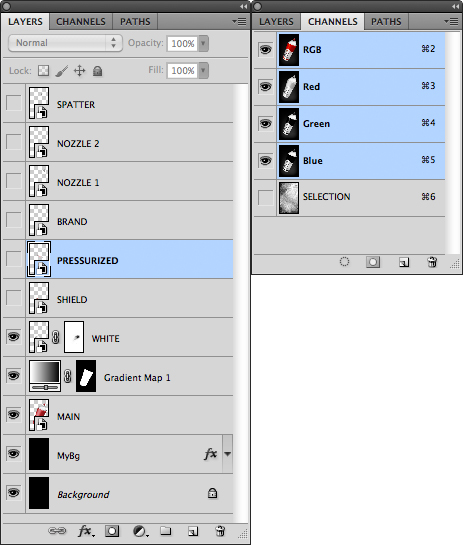
By now you should have something like this on your Layers and Channels window.
Step 27
Let’s make some scratches to the shield. Reveal the SHIELD layer. Add a layer mask to it by clicking the Add Layer Mask button at the bottom of the Layers Window. Go to the Channels window and Command/Ctrl + Click over the thumbnail of the SELECTION channel. Press Command/Ctrl + H to hide the selection. Go to your Layers Window again and select the Layer mask of the SHIELD layer. Paint with color black over the shield to make some scratches appear. Remember, to erase scratches, just paint with white.
With a layer mask selected you can toggle from black to white and vice versa by pressing the X key.
If you finished with the scratches, remember to remove the selection. You cannot see it because we hid it, but it is there; so press Command/Ctrl + H to reveal the selection and Command/Ctrl + D to remove it.
Step 28
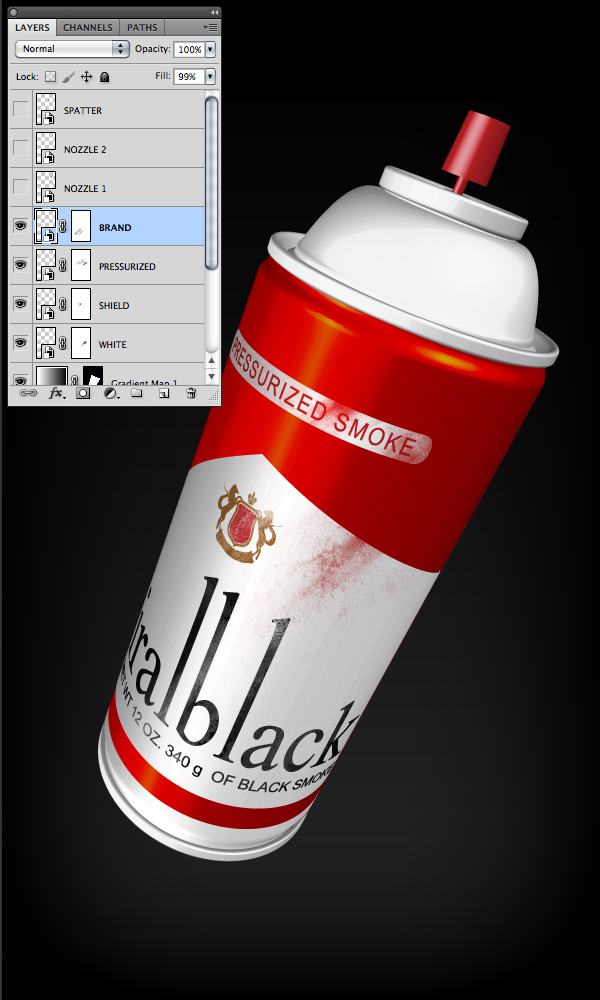
Repeat Step 27 for the PRESSURIZED and the BRAND layers.
Step 29
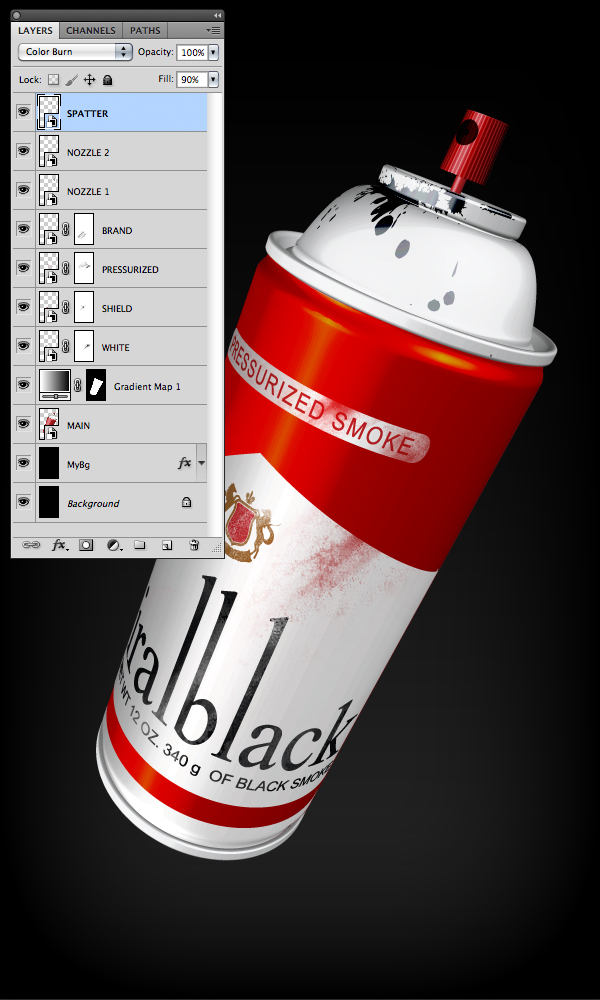
Reveal the NOZZLE 1 Layer; turn its blending mode to Color Burn and its fill to 40%. Reveal the NOZZLE 2 Layer; turn its blending mode to Linear Burn. Reveal the SPATTER Layer; turn its blending mode to Color Burn and its fill to 90%.
Step 30
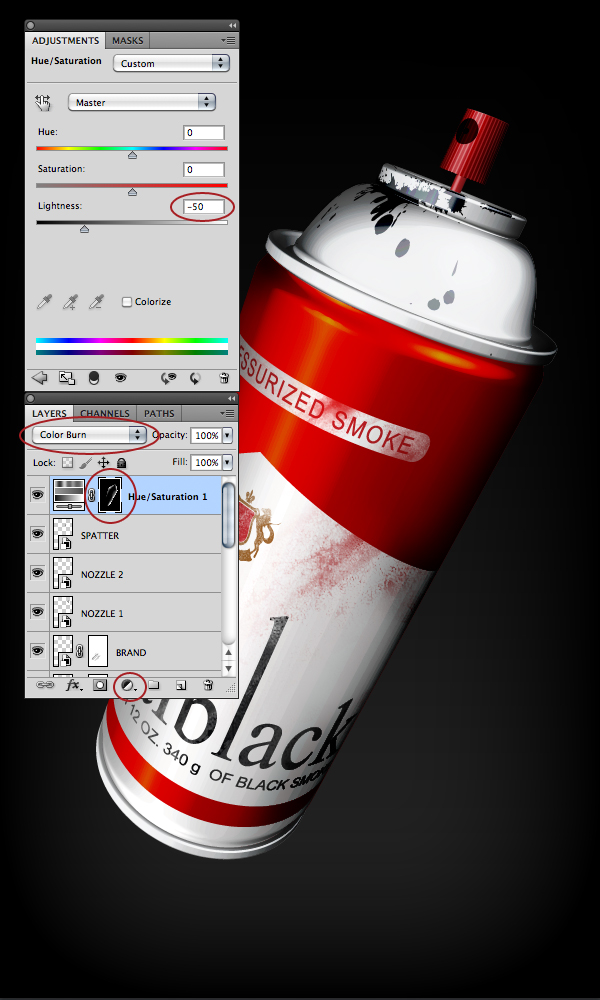
Now let’s add some more shadows to the entire spray can. In the Layers Window, select the SPATTER layer. Press the Create New Fill of Adjustments Layer button at the bottom of the Layers Window. Select "Hue/Saturation…" Select the Layer mask of the Hue/Saturation 1 layer and press Command/Ctrl + I to invert it. Change the blending mode of the Hue/Saturation 1 layer to Color Burn. Go to the Adjustments Window and turn the Lightness to -50.
Now with the layer mask of the Hue/Saturation 1 layer selected, start painting with white on the sides of the spray can to add more shadows. Remember, you can always remove what you painted, by painting with black over the layer mask.
If you finished adding shadows to the spray can, you will notice that the background also darkened. We will remove that now.
Go to your MAIN layer and Command/Ctrl + Click on its thumbnail. This will make a selection of the spray can. Press Command/Ctrl + shift + I to invert the selection, because we want a selection of the background, not the spray can. Select the layer mask of the Hue/Saturation 1 layer, make sure that in your Tools window the background color is black, and press the Delete key.
Step 31
Now let’s add some more Texture to the entire spray can to make it look dirtier. Go to the Channels window and select your SELECTION channel. Press Command/Ctrl + A to select all. Press Command/Ctrl + C to Copy.
Go to the Layers Window and with the Hue/Saturation 1 layer selected press Command/Ctrl + V to paste your selection channel as a layer. Rename the layer to TEXTURE. Press Command/Ctrl + Click on the layer mask of the Hue/Saturation 1 layer to make a selection out of it.
Select the TEXTURE Layer and press the Add Layer Mask button at the bottom of the Layers Window. Change the layers blend mode to Multiply and the fill to 50%.
Step 32
Now we have finished with the spray can, so we can make a group with all its elements. Select TEXTURE layer, and with the Shift key pressed, select the MAIN layer. Press Command/Ctrl + G to group all of the spray can layers and rename the group to SPRAY. Your Layers Window should look like the following image.
Step 33
Let’s create the Smoke. Create a new layer over the SPRAY group and name it SMOKE. In the menu, go to Filter > Render > Clouds.
Press the Add Layer Mask button at the bottom of the Layers Window. Press Command/Ctrl + I to invert it. With the Layer mask of the SMOKE Layer selected, paint with white to reveal the smoke.
We will turn the smoke a little green. Press the Create New Layer or Adjustment layer button. That creates a new layer named Hue / Saturation 2. Select the Hue / Saturation 2 Layer and in the Adjustments Window enter the values of the image bellow. Note that the Colorize option is checked. With the Layer mask of the Hue / Saturation 2 layer selected, press Command/Ctrl + I to invert the mask. Paint with white to reveal the green color.
Step 34
Go to Illustrator and create a spiral with the settings of the following image. To pop up the spiral window click on your document with the Spiral tool selected. Go to the menu, press Object > Expand Appearance. Press Command/Ctrl + C to copy the spiral.
Step 35
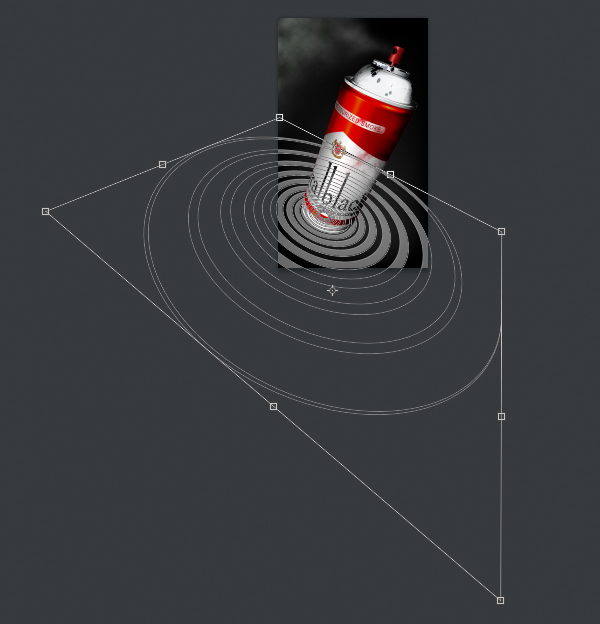
Go to back to Photoshop and press Command/Ctrl + V to paste the spiral over the MyBg layer. Rename the layer to SPIRAL. Press Command/Ctrl + T and the Transform Handles will appear; then press Command/Ctrl and drag the handles to distort the spiral as seen in the following image. Press Enter/Return when done.
Step 36
Press the Create Layer Mask button at the bottom of the Layers Window. Press the G key to select the Gradient tool and make sure you have a black and white gradient. With the layer mask of the spiral layer selected, drag diagonally to hide the backside of the spiral in the distance.
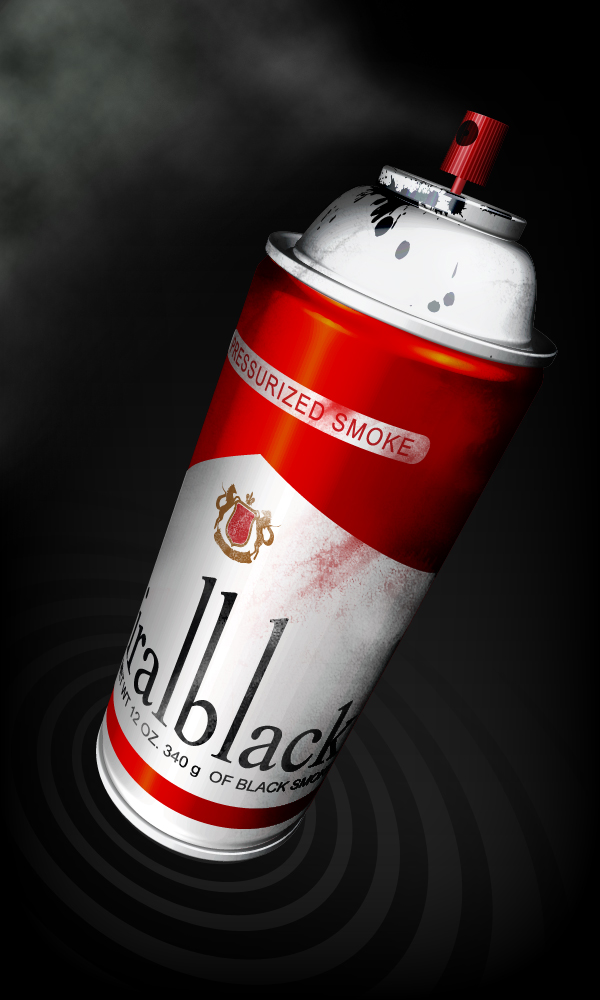
Final Image

Source: http://feedproxy.google.com/~r/psdtuts/~3/UmR8F33qOAQ/
design a room online for free design a room online free design a room online game design a room paint design a room program design a room software design a room tool design a room virtually design a room with paint design a rooms