In the movies, we often see images of ruined landscapes or apocalyptic cities. What many of us don’t know however is that much of this imagery was produced not with complicated CG software but instead, using Photoshop. In today’s tutorial we will demonstrate how to create a post-apocalyptic matte painting of an old cathedral. Let’s get started!
Tutorial Assets
Step 1
Create a new document. Use any size you want but for this scene I recommend using a 2:1 ratio, meaning that you can use resolutions like 2000×1000 and 1000×500. For this tutorial, I will be using the 1000×500 resolution. The color mode and bit depth do not matter for now.
First, let’s import the Cathedral image. You can see that it is a very large image. This is a good thing because it will downscale quite nicely. To resize and position the image, hit Command/Ctrl + T on your keyboard or go to Edit > Free transform. To scale an image while maintaining its proportions, hold the Shift key while resizing it. When you’re satisfied with the result, you’ve now got the base of the whole composition.
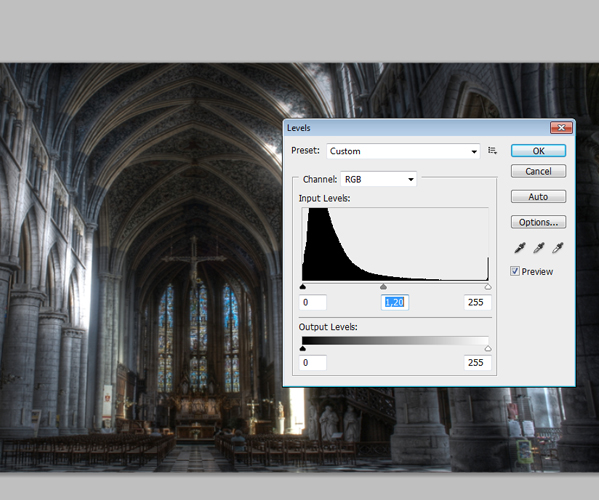
Go to Image > Adjustments > Levels. As you can see in the histogram, a lot of data is being stored in the black area which means that we’ve got an under exposured image. To get some more data out of the high and mid tones, change the value of the mid tones from 1.00 to about 1.20. Now we’re ready to go.
Step 2
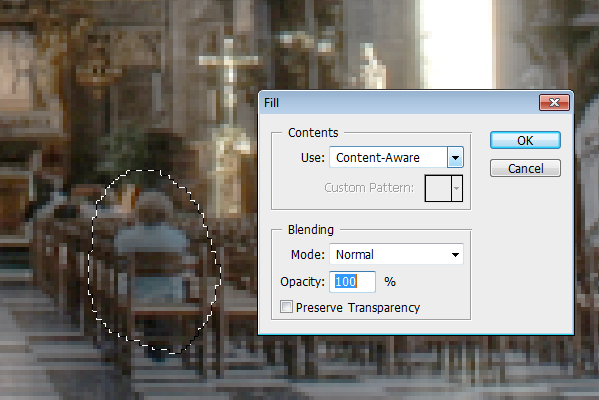
As you can see we’ve got a problem. At the moment this photograph was made, two people who probably wanted to ruin our image, took a seat in the wooden seats on the bottom of the image. Obviously, we want to remove the people. To do this, we are going to use one of Photoshop’s amazing features, the content aware fill option.
To do this, use the lasso tool or hit L on your keyboard and draw a circle around the subject. Be sure to also integrate some pieces of the environment into it so that Photoshop knows what to erase. Once selected, click with the right mouse button on the selection and under the Use: tab select Content-Aware. Unfortunately, this feature is only available in Photoshop CS5 so I would recommend people who use older versions of the software to play around with the clone stamp tool. Anyway, once the content-aware fill is applied you are probably going to have some problems. This, however, can easily be solved by using the Spot Healing Brush Tool. Ultimately you want to have a result that looks good, so some cheating is okay.
Step 3
Create a new layer called ”Fog” and set the blending mode to Soft Light. Now use a big round soft brush and paint over the dark middle area of the image covering all the stuff in the back of the scene like a part of the roof and the windows. Then reduce the opacity of the layer a little bit. This will create a natural effect, because also in real life this rule generally applies: the further away you are from an object the less contrast your eyes can detect. See the comparison image below to see the effect.

Step 4
Now we’ve got to start adding elements into the scene. Let’s start by modifying some big elements in the scene by adding some vines onto the main pillars of the cathedral.
Load the vines image and position and scale it properly, so that the vines look like they actually grow around the pillars. Due to the fact that the vine image is pretty small compared to the first image you need to duplicate and rotate it some times. A helpful thing is to duplicate the image and then rotate it 180°. Then, when you’ve finished positioning the vines it’s time to apply some color correction to make them blend properly.
A handy tip is to look at the brightest areas of the image you want to blend your element with, in this case the cathedral image. Now, the area in the front covering the pillars is quite dark so you should decrease the high tones by taking the second point on the curve and moving it down as shown in the image after opening the Curves windows by going to Image > Adjustments > Curves. Also, you need to take a look at the color tone of the cathedral ruins, which suggests a slight increase in the red channel. Also, add a slight contrast and play around with the curves in order to make the perfect blending.

Step 5
Once you’ve repeated the process and attached the vines to multiple pillars it’s time to add the other elements. Import the image of the rocks. First of all, we’ve got to isolate the rocks from the sky and from the sand. To do this, select the sky and the sand and then go to Refine Edge. This opens a window which is pretty much the key to advanced selections. Particularly the first option is really handy in Photoshop CS5, called the Edge Detection parameter. This will automatically detect the edges of the object you want to isolate and like magic, it makes a perfect selection.
You should also play around with the other parameters like Shift Edge and Smooth. When you’ve got your selection, inverse it and delete the edges like shown in the animation below. Now you can place the rocks and repeat the color correction process from the third step. The same applies to the foreground dirt pile.

Step 6
With the basic setup done, we can now add smaller details like the tombstone in the middle. To d
No comments:
Post a Comment